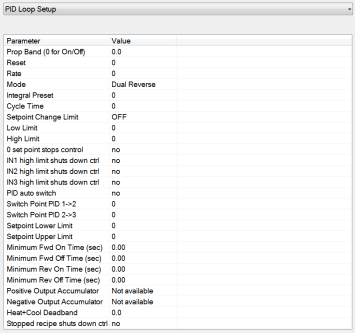
PID Loop Setup

PID is the tuning parameters entered for each Process Variable loop.
Prop Band (0 for On/Off)
This is the proportional band field. P = Proportional (Prop Band). This is a field in which you want to stay around the setpoint. The range is 0 – 999.0
Reset
This is the reset field. I = Integral (Reset). This is the actual temperature being monitored over a period of time and then averaged to keep within the Proportional band. The reset is in repeats per minute. This affects the output of the controller. It will be proportional to the amount of time the error is present. This helps to eliminate offset. The range is
0 – 100.00
Rate
This is the rate field. D = Derivative (Rate). This is the sudden change or rate in the temperature. This rate is in minutes. This affects the controller output which is proportional to the rate of change of the measurement and will control the amount of output by time restraints. Thus derivative takes action to inhibit more rapid changes of the measurement than proportional action. Derivative is often used to avoid overshoot. The range is 0 – 100.00. The rate is not typically used for heating/carbon.
Mode
This is the mode of the loop. The values are: Dual Reverse, Single Reverse, Dual Direct, or Single Direct.
Dual – This has two output relays which can increase and decrease to achieve your SP.
Single – This has one relay which works in only one direction to achieve your SP.
Direct - If the PV - SP equals a positive number and the output would bring the PV down toward setpoint that is direct.
Reverse – If the PV - SP equals a negative number and the output would bring the PV up toward setpoint then that is reverse
Example: If a 12 mA output drives a 0 degree F temperature (PV) UP to a 1200 degree F temperature (SP), this would be REVERSE, and since this would take a SINGLE output from the controller, the Mode for the Temperature Loop is Single Reverse.
Integral Preset
This field provides an offset for the starting point for PID control, also referred to as “Load Line” or “Manual Reset”. The range is –100 to 100.
Cycle Time
This field is typically set to the valve travel time multiplied by 1.5. The range is 0 – 300.
Setpoint Change Limit
This is a smart time feature that allows Process Loop to use PB only without Reset until the Process Variable drops below the percent output set under this category.
It is used to eliminate overshoot.
The Output percentage selected under this category must be above the normal operating output percentage of the furnace at heat.
The options are: OFF, 80%, 70%, 60%, 50%, 40%, 30%, or 20%.
Example: If the furnace runs at 40% output at heat for the maximum load, the setpoint change limit should be set to 60%.
Low Limit
This is the low limit for the loop. The range is –100 to 100.
High Limit
This is the high limit for the loop. The range is –100 to 100.
0 Setpoint Stops Control
If the Setpoint is zero, then all outputs are turned off. The option is either Yes or No.
IN1 high limit shuts down ctrl
If input 1’s high limit is reached, then all outputs are turned off. The value can either be Yes or No.
IN2 high limit shuts down ctrl
If input 2’s high limit is reached, then all outputs are turned off. The value can either be Yes or No.
IN3 high limit shuts down ctrl
If input 3’s high limit is reached, then all outputs are turned off. The value can either be Yes or No.
PID Auto Switch
This is the PID auto switch field. The value can either be Yes or No.
Switch Point PID 1 -> 2
This is the PID Switch Point field. This is used in conjunction with the PV Switching feature. See the PV Switching section for more information. The range is –300 to 4000. NOTE: PID switch points are based on Temperature PV, not Setpoint or Ramp Temperature.
Switch Point PID 2 -> 3
This is the PID Switch Point field. This is used in conjunction with the PV Switching feature. See the PV Switching section for more information. The range is –300 to 4000. NOTE: PID switch points are based on Temperature PV, not Setpoint or Ramp Temperature.
Setpoint Lower Limit
This is the lower limit of the setpoint. The range is –300 to 9999.
Setpoint Upper Limit
This is the upper limit for the setpoint. The range is –300 to 9999.
The Minimum Forward On, Forward Off, Reverse On, and Reverse Off times discussed below are used to help prevent premature wear of relay contacts.
Minimum Forward On Time (sec)
This setting specifies the minimum number of seconds for which output must remain on before the control is turned off. The minimum value for this setting is 0; the maximum value is 100.
Minimum Forward Off Time (sec)
This setting specifies the minimum number of seconds for which the control must remain off after heat is applied. The minimum value for this setting is 0; the maximum value is 100.
Minimum Reverse On Time (sec)
This setting specifies the minimum number of seconds for which output must remain on before the control is turned off. The minimum value for this setting is 0; the maximum value is 100.
Minimum Reverse Off Time (sec)
This setting specifies the minimum number of seconds for which the control must remain off after cooling is applied. The minimum value for this setting is 0; the maximum value is 100.
Cascade SP Lower Limit
This is the cascade setpoint low limit. The 9130 uses the difference between the cascade SP lower limit and the cascade SP upper limit and multiplies that value by the % output of the load loop. It then offsets this value by the cascade SP lower limit and feeds the furnace loop this value as a setpoint.
Cascade SP Upper Limit
This is the cascade setpoint upper limit. The 9130 uses the difference between the cascade SP lower limit and the cascade SP upper limit and multiplies that value by the % output of the load loop. It then offsets this value by the cascade SP lower limit and feeds the furnace loop this value as a setpoint.
Example:
Cascade SP Lower Limit: 0
Cascade SP Upper Limit: 2000
The load has a setpoint of 1700 and it is at 37 % output. The furnace setpoint will be calculated as follows: (2000 – 0) * 0.37 + 0 = 740.
The Return button will return the user to the menu screen.
Positive Output Accumulator
The Positive Output Accumulator is the sum of the positive outputs (given in percentages up to one decimal place) measured each second. Therefore, if the following outputs are recorded over five seconds:
|
Output (in %) |
Second Passed |
|
100.0 |
1 |
|
99.0 |
2 |
|
99.0 |
3 |
|
98.0 |
4 |
|
97.0 |
5 |
Then the value for the Positive Output Accumulator after five seconds will be (100.0 + 99.0 + 99.0 + 98.0 + 97.0) or 493.0.
To reset the Positive Output Accumulator, simply click Edit while the Positive Output Accumulator is highlighted and confirm the reset. This will cause the Positive Output Accumulator to be reset to zero and start accumulating values again from that point.
Negative Output Accumulator
The Negative Output Accumulator is the sum of the negative outputs (given in percentages up to one decimal place) measured each second. The sum of the negative values is expressed as a positive value. This means that, if an output of -50% is recorded after one second, a value of 50 will be added to the Negative Output Accumulator. Similarly, if the following outputs are recorded over five seconds:
|
Output (in %) |
Seconds Passed |
|
-20.0 |
1 |
|
-20.0 |
2 |
|
-21.0 |
3 |
|
-21.0 |
4 |
|
-22.0 |
5 |
Then the value for the Negative Output Accumulator after five seconds will be (20.0 + 20.0 + 21.0 + 21.0 + 22.0) or 104.
To reset the Negative Output Accumulator, simply click Edit while the Negative Output Accumulator is highlighted and confirm the reset. This will cause the Negative Output Accumulator to be reset to zero and start accumulating values again from that point.
Heating and Cooling Control
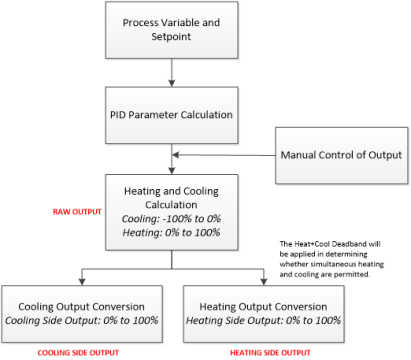
The SSi 9130 controller can perform heating + cooling control with individual PIDs for heating and cooling action. In automatic mode the calculated control loop output from the active PID is split into separate cooling (-100 to 0%) and heating (0 to 100%) outputs. The flowchart below provides a graphical illustration of the process:

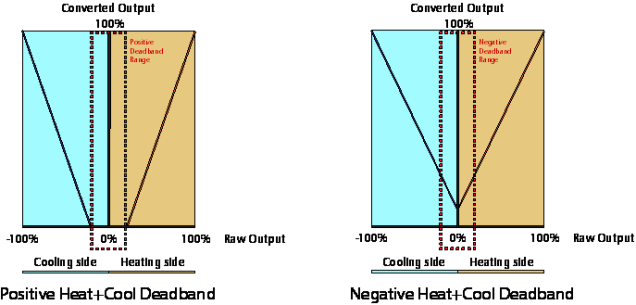
The 9130 Heat + Cool control loop deadband parameter is used to control whether the cooling and heating output are permitted to operate at the same time or are both inhibited near 0% output.
|
Heat+Cool Deadband Value: Positive or Negative |
Raw Output Relative to Deadband Value |
Effect on Heating and Cooling Cycles |
|
Positive |
Output is Below Deadband Value |
Both cycles are disabled |
|
Negative |
Output with Negative Sign Removed is Equal to or Below Deadband Value with Negative Sign Removed |
Simultaneous heating and cooling is allowed |
The table below provides examples of how the deadband setting may be applied and what the result in the control process would be at a specific output percentage.
|
Heat+Cool Deadband Setting |
Raw Output Percentage |
Result, if heating and cooling cycles are operating at the same time |
|
+3% (no output below +3%) |
+2% |
No output |
|
-2% (heat+cool overlap is permitted for -1%) |
-1% |
Both heat and cool can be on simultaneously |
Finally, the graphs below indicate, visually, how the positive and negative deadband ranges function in the control process.

Stopped Recipe Shuts Down Control
This setting specifies whether or not the control will stop when a recipe is not running. If the setting is “Yes”, the control will stop when a recipe is not running. If the setting is “No”, the operation of the control will not be affected by a stoppage of the recipe.